gitlab 安装管理教程
前言
安装环境:Ubuntu 22.04
一、安装
参考文档:https://gitlab.cn/install/
# 更新安装源
sudo apt update
# 安装基本依赖(安装过程中出现选项都默认即可,使用TAB按键切换到OK选项,然后回车)
sudo apt-get install -y curl openssh-server ca-certificates tzdata perl
sudo apt-get install -y postfix
# 添加 GitLab 存储库
curl -fsSL https://packages.gitlab.cn/repository/raw/scripts/setup.sh | /bin/bash
# 安装Gitlab(执行成功后会出现狐狸头logo)
sudo EXTERNAL_URL="https://gitlab.example.com" apt-get install gitlab-jh安装完成后使用root用户进行登录,root用户的初始密码在/etc/gitlab/initial_root_password文件中,进系统后尽快修改root密码,初始密码会在24小时后失效
二、系统基本配置
以下配置通过修改系统配置文件进行修改,需要有root权限,在修改完成后执行gitlab-ctl reconfigure命令生效修改。
1) 修改仓库存储位置
在gitlab中创建仓库,默认仓库存储在/var/opt/gitlab/git-data/repositories路径下。可能该目录下存储空间并不足以存储大量的仓库数据。这时就需要更改仓库的存储位置,尽量在安装后修改存储位置,否则还涉及到旧仓库迁移的问题。
配置文件位置/etc/gitlab/gitlab.rb,按照以下参数配置,可搜索git_data_dirs找到配置
git_data_dirs({
  "default" => {
    "path" => "/home/gitlab"
   }
})
2) 修改访问端口号
默认端口号为80端口,如果与系统其它应用的端口号冲突或其它原因需要修改端口。修改配置文件/etc/gitlab/gitlab.rb
nginx['listen_port'] = 76543) 配置URL
URL会用在系统发送邮件的链接、仓库克隆的http地址等,不进行配置会导致系统生成的链接不可用。
external_url 'http://192.168.5.10:7654'4) gitlab整体迁移
三、gitlab系统配置-网页端
网页端的主要跳转窗口在左上角搜索或转到,如果不明白我的意思,可以点击看一下,是个比较重要的操作跳转点

点击后出现以下窗口,以下是root用户登录后可选的菜单,其它用户可能会少一些。配置主要在管理中心,后续说明的管理中心如无特殊说明,均指此处的管理中心。

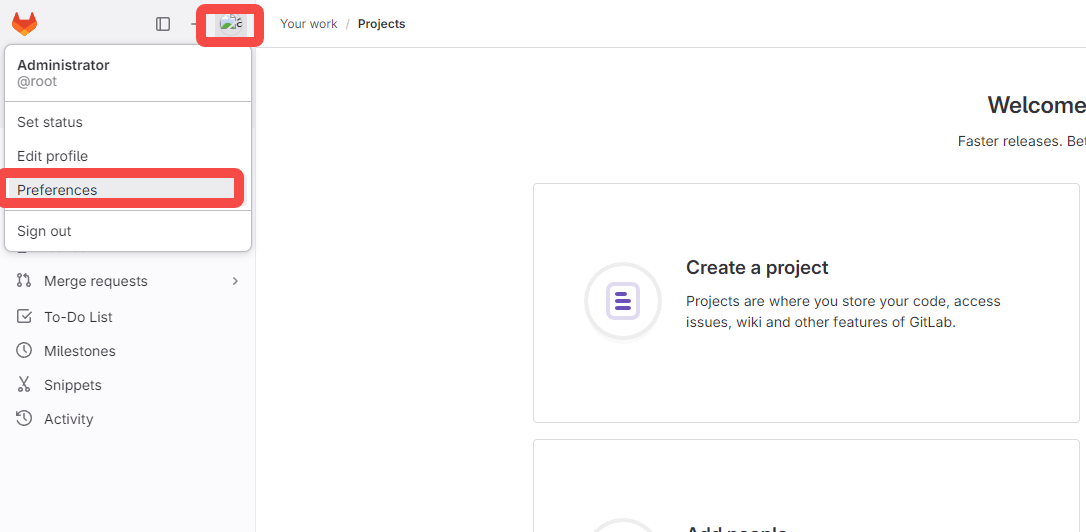
1) 修改系统语言
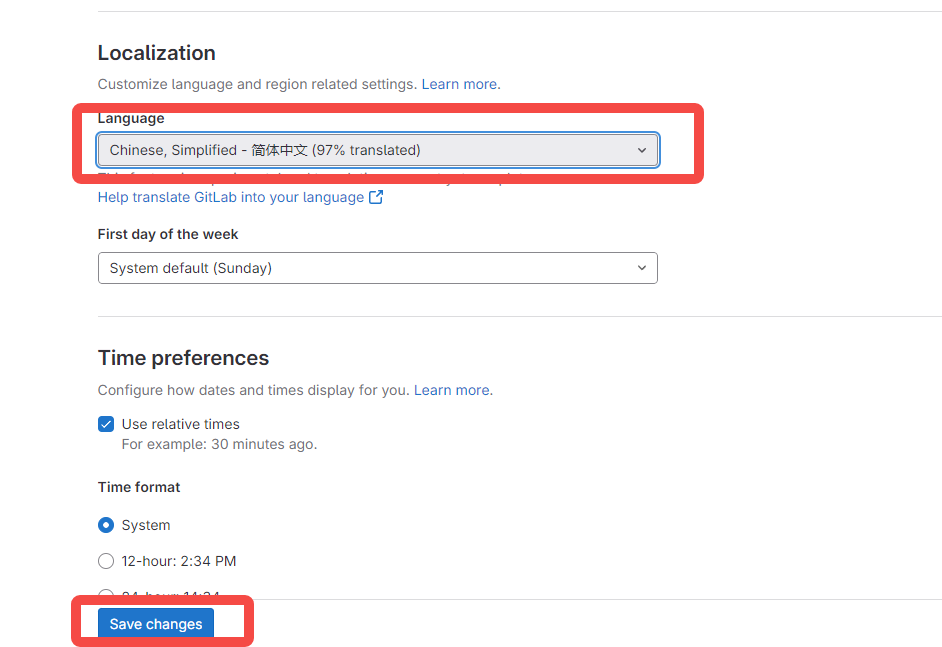
root用户登录,右上角头像,Settings -> Preferences -> Localization -> Language,选择“简体中文”即可。
选择简体中文,保存配置
2) 注册限制
转到管理中心-->设置-->通用
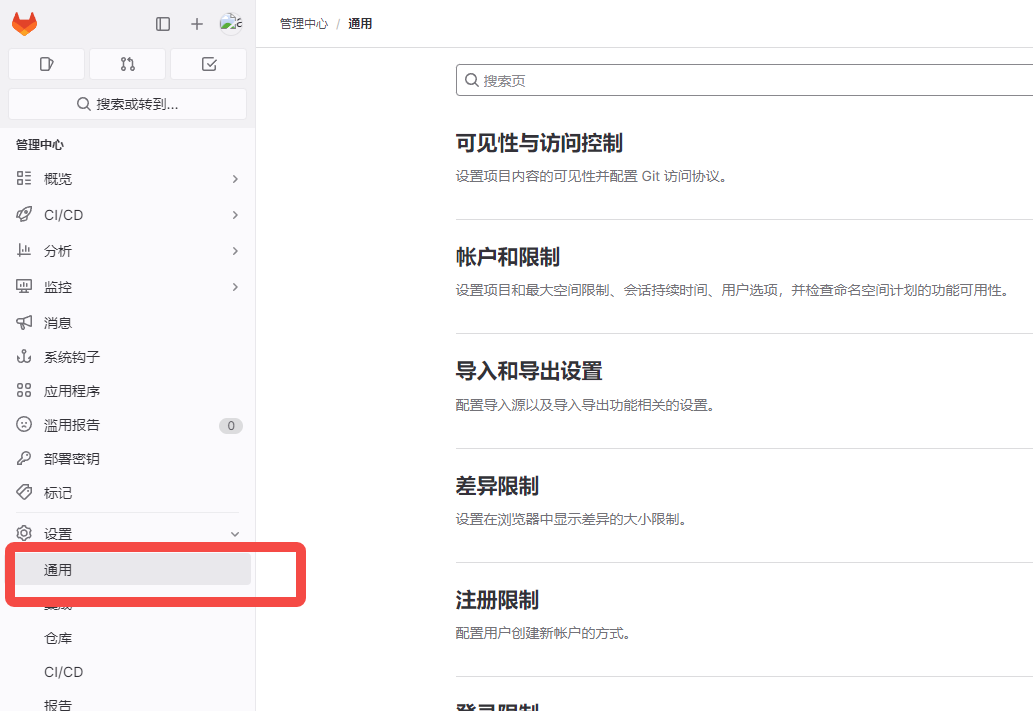
选择注册限制选项,包括以下配置。
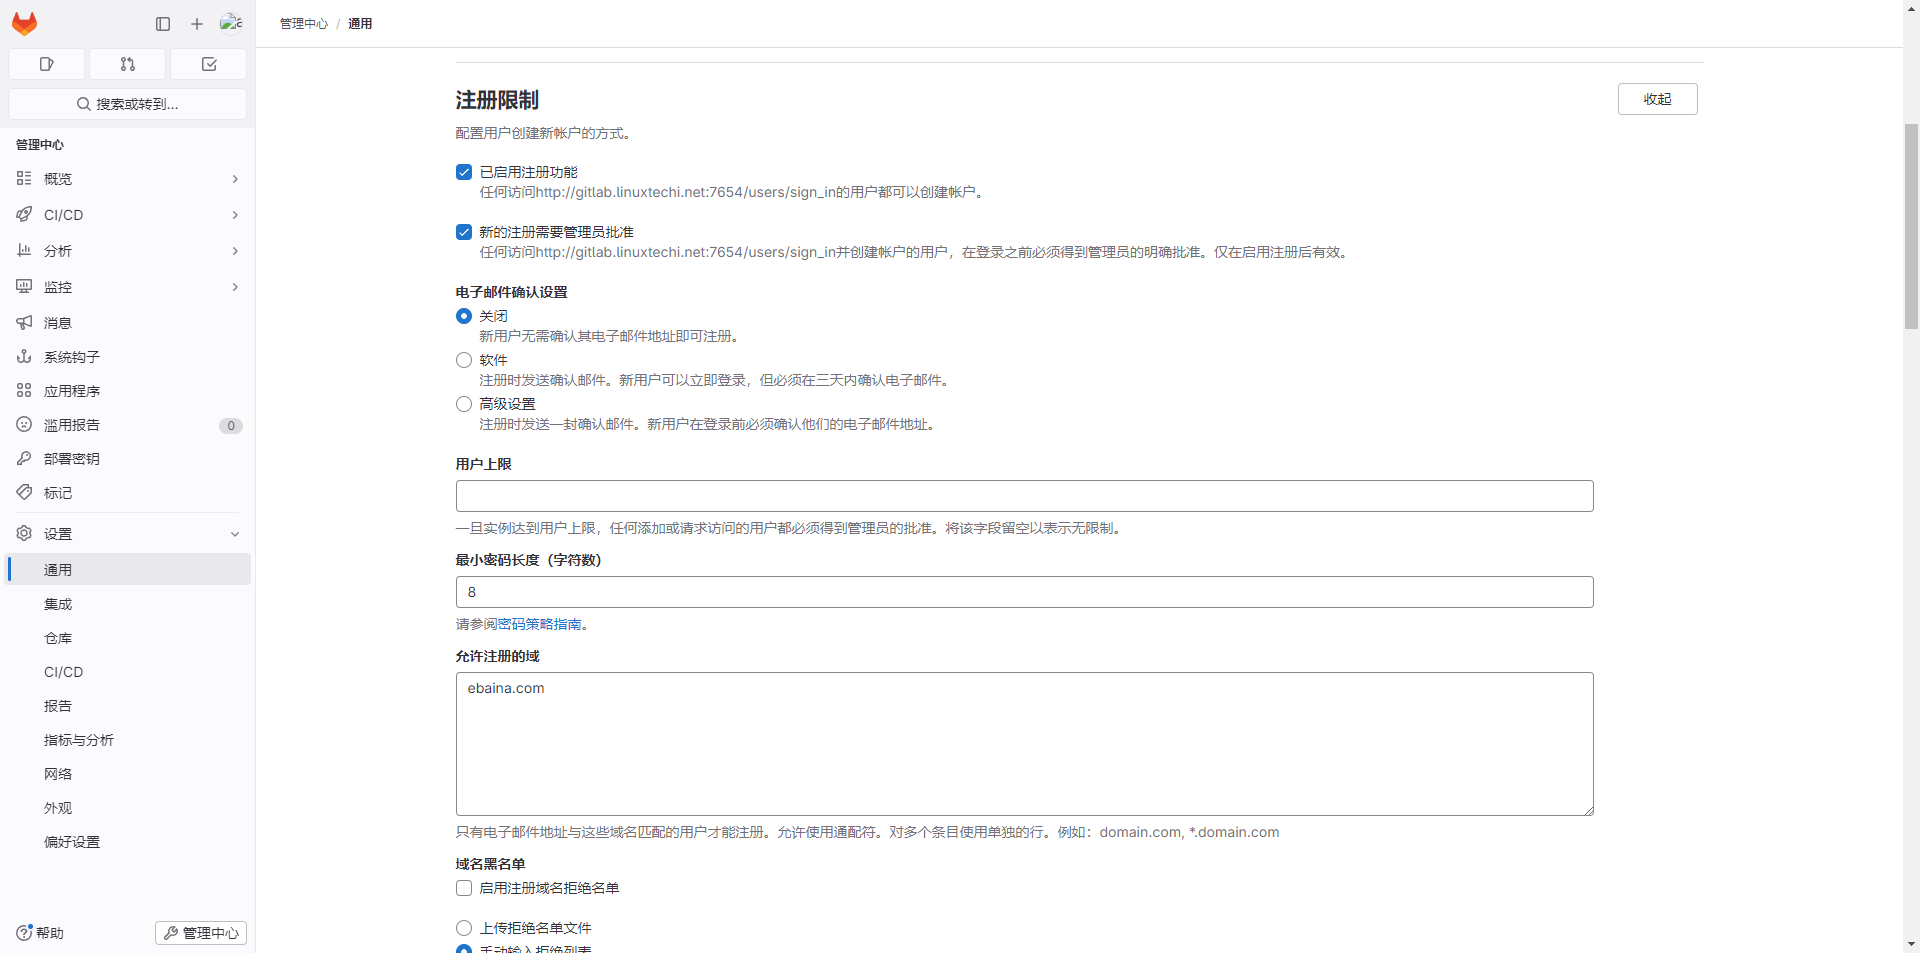
建议默认配置即可,对代码提交邮箱有限制的可以限制可注册的域
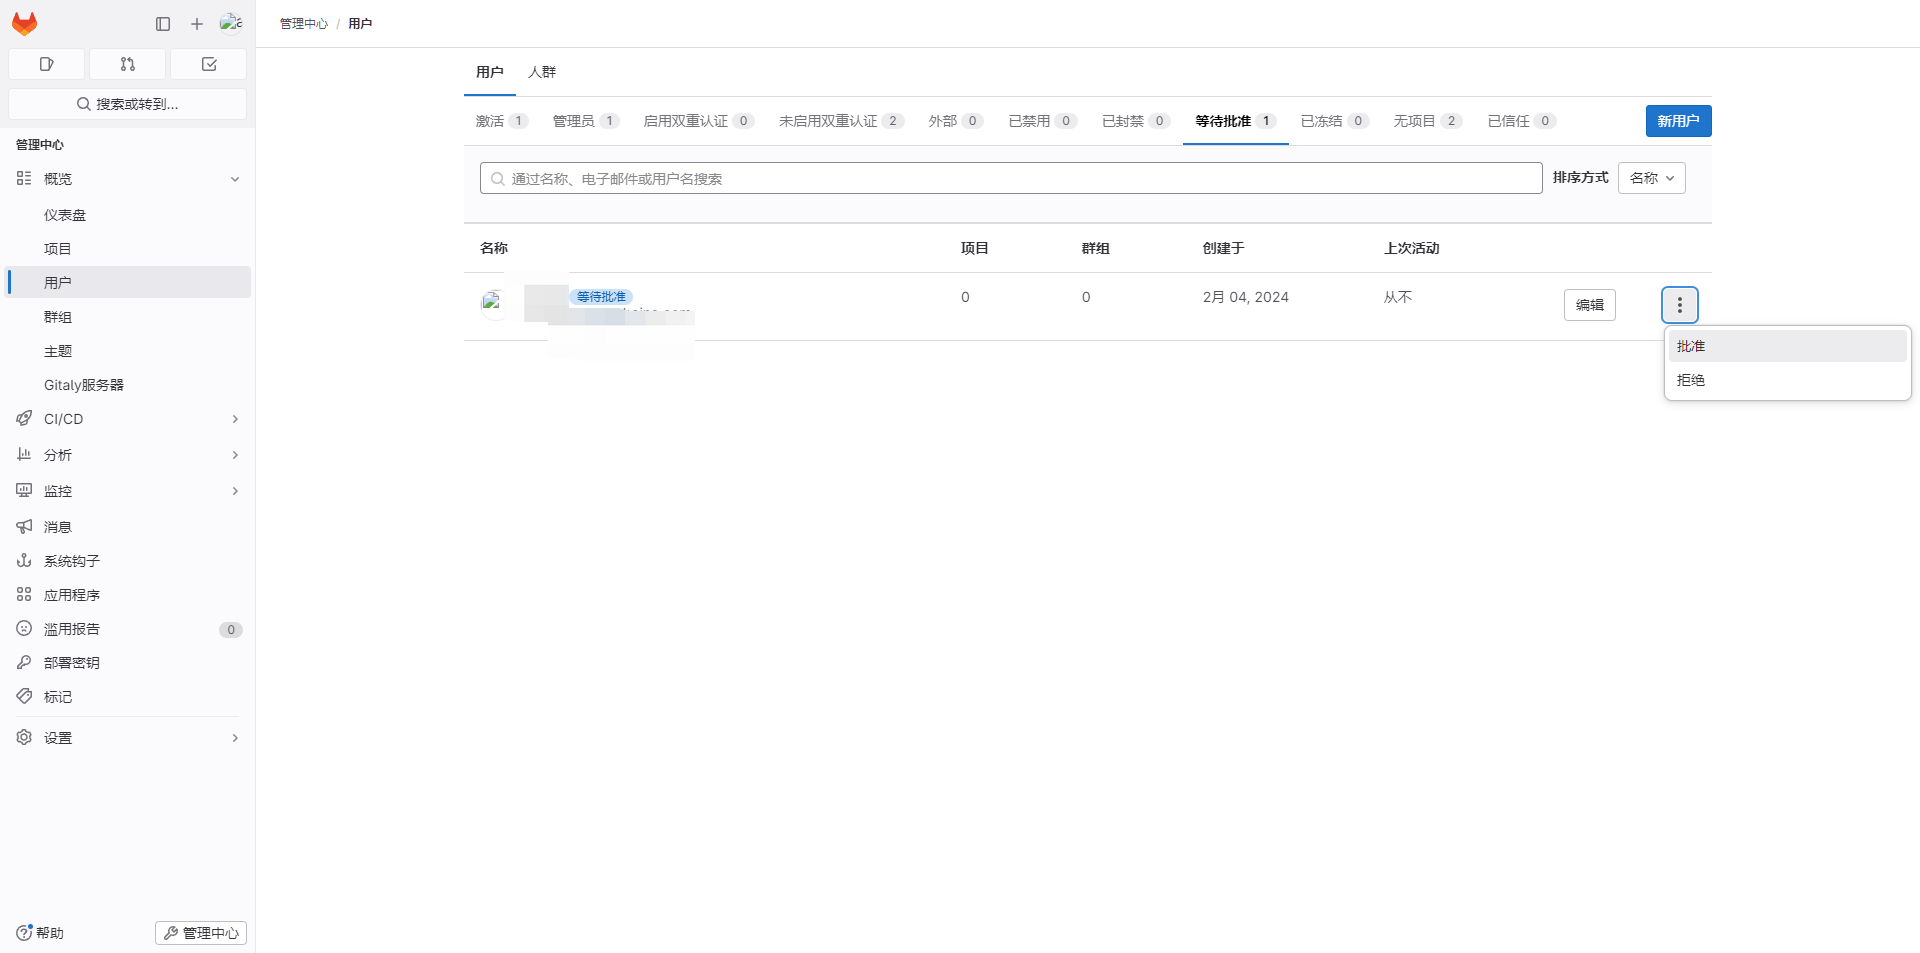
3) 管理员注册审核
转到管理中心-->概览-->用户-->等待批准
四、仓库配置
1) 仓库权限
GitLab用户在组中有五种权限:Guest、Reporter、Developer、Maintainer、Owner。
Guest:可以创建issue、发表评论,不能读写版本库
Reporter:可以克隆代码,不能提交,QA、PM可以赋予这个权限
Developer:可以克隆代码、开发、提交、push,RD可以赋予这个权限
Maintainer:可以创建项目、添加tag、保护分支、添加项目成员、编辑项目,核心RD负责人可以赋予这个权限。
Owner:可以设置项目访问权限 - Visibility Level、删除项目、迁移项目、管理组成员,开发组leader可以赋予这个权限。
Gitlab中的组和项目有三种访问权限:Private、Internal、Public。
Private:只有组成员才能看到;Internal:只要登录的用户就能看到;Public:所有人都能看到。开源项目和组设置的是Internal。
gitlab 官方文档《Permissions and roles》
2) 自动化构建
runner是什么
runner负责运行自动化构建脚本。runner既可以独属于某个仓库,也可以多个仓库共享。常用的几种runner类型包括
shell、ssh、docker。runner可以在这些环境下运行。runner可以在仓库进行提交的时候自动检查构建,在构建出错时可以发送邮件给提交者。创建一个runner
选中需要创建runner的仓库,
设置-->CI/CD
展开Runner选项,可以看到新建项目Runner和其它可用的Runner。可以为当前仓库单独创建runner或者共享其它项目的runner
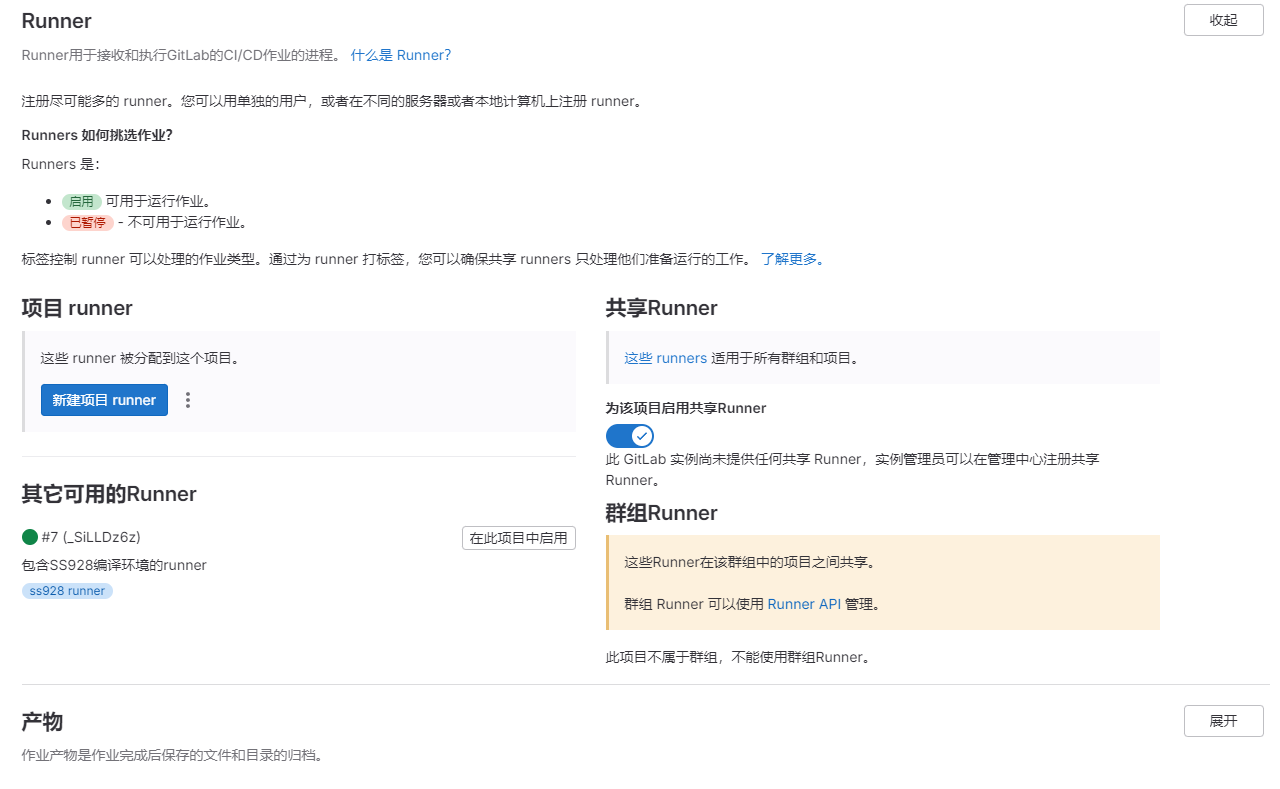
在新建项目Runner中选择操作系统为Linux,填写标签和描述即可。如果需要在每次提交时运行则需要勾选
运行未打标签的作业,否则只在创建标签时运行。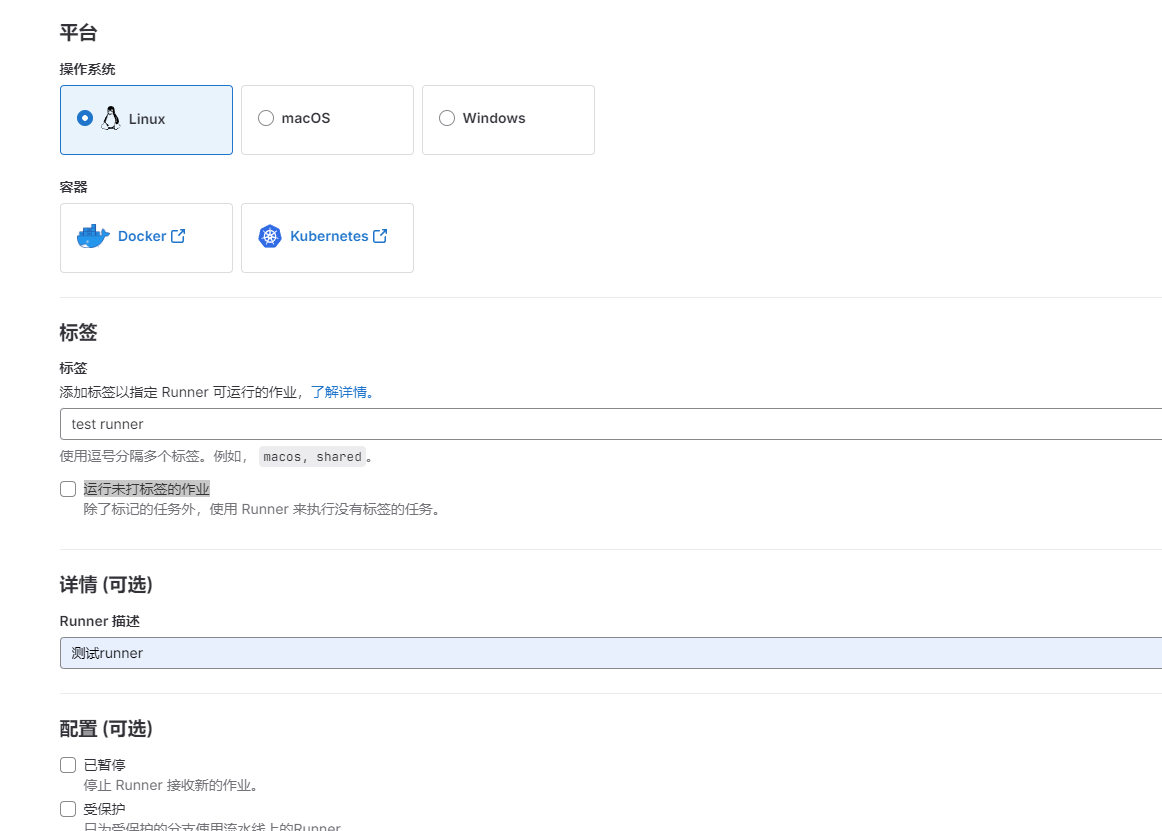
点击创建Runner,出现以下页面,复制步骤一中的命令到安装gitlab的服务器上并执行
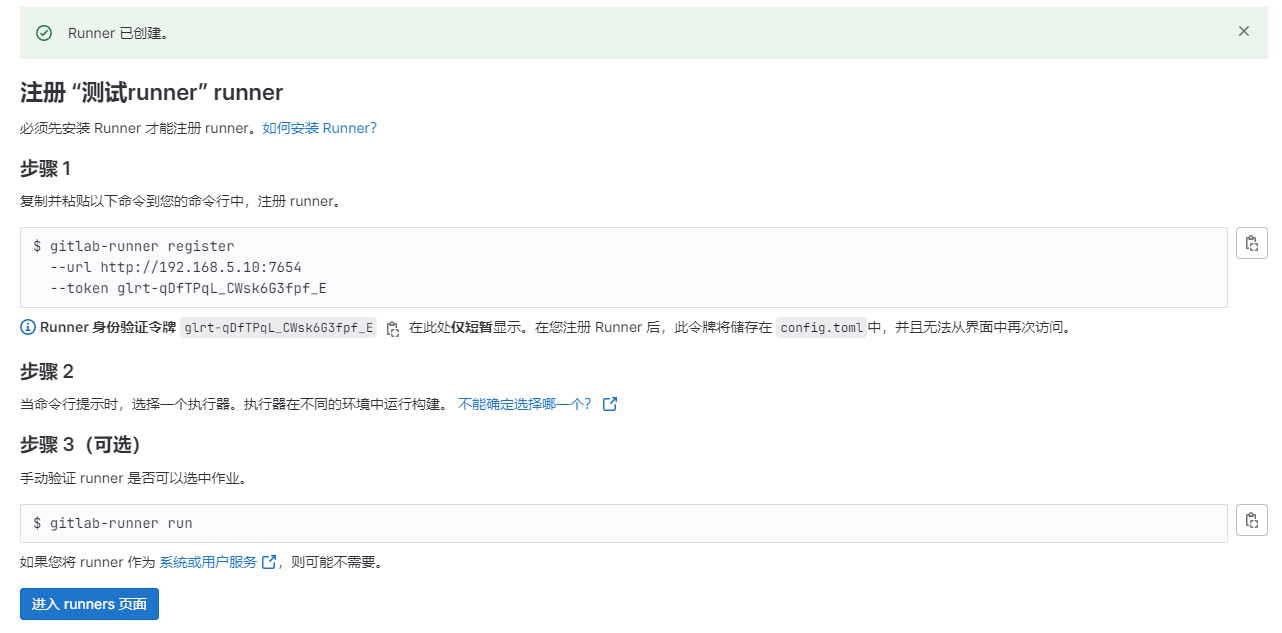
如果需要使用ssh连接到runner,则需要提供ssh连接的密钥。还需要注意的是gitlab还需要know_host文件,如果执行注册runner命令的不包含该文件可以先使用ssh连接对应的server创建know_host文件。
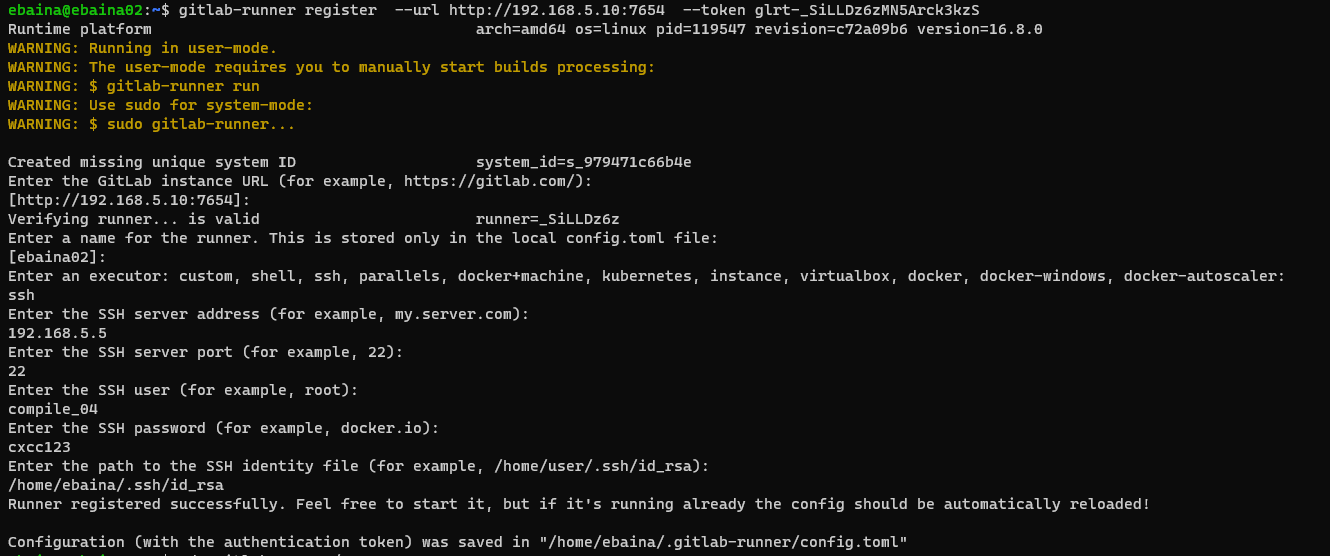
创建成功后执行
gitlab-runner start即可,网页端会提示已经创建一个新的runner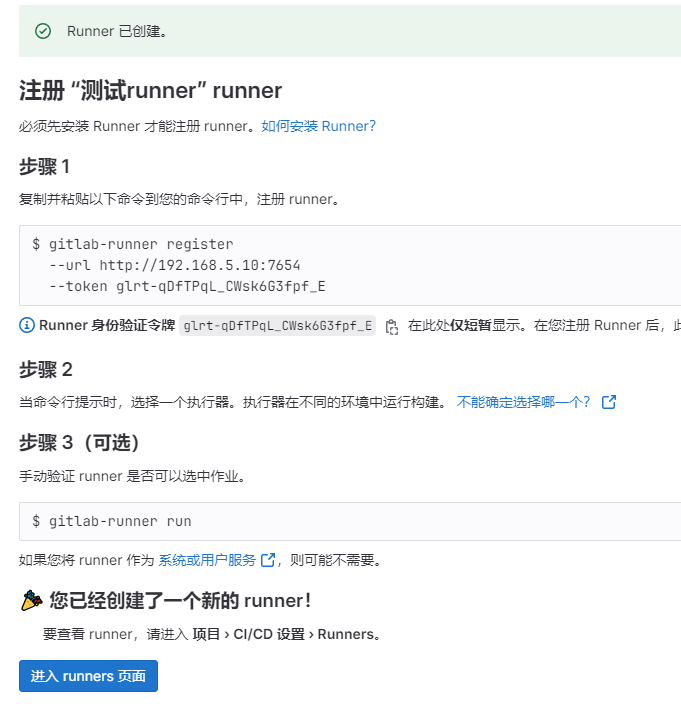
为仓库创建流水线
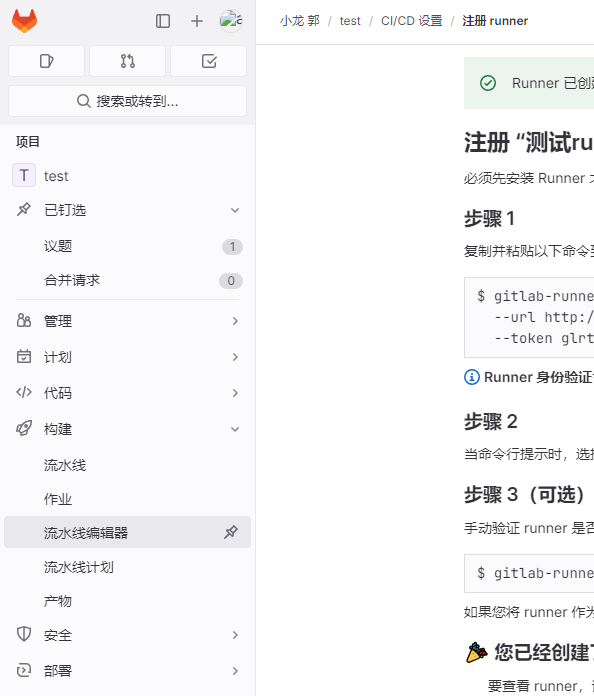
点击流水线编辑器
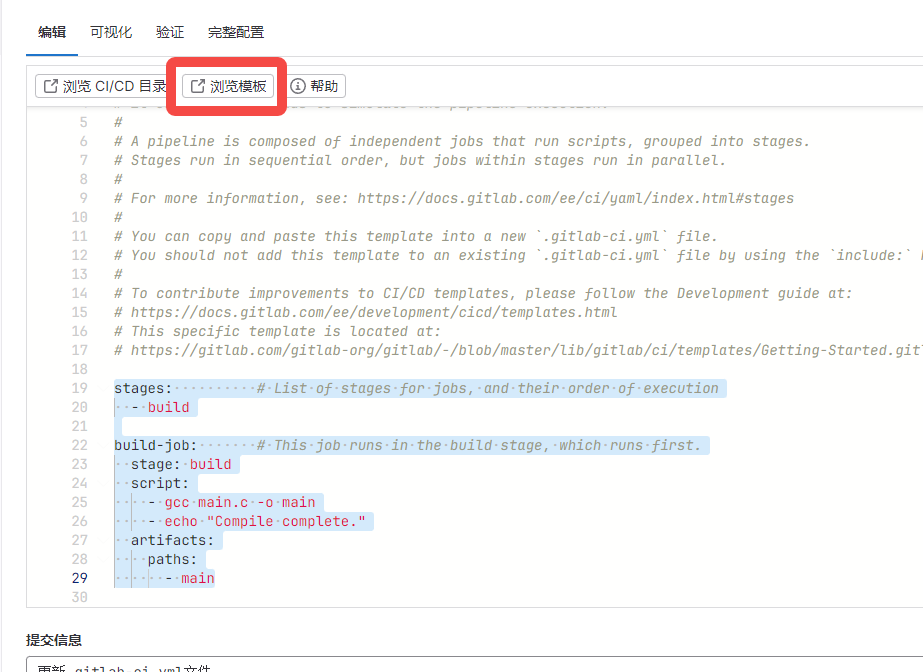
下面是一个简单的helloworld的流水线参考。样例中会通过命令编译helloworld,最终的产物中包含一个main的可执行文件
stages:          # List of stages for jobs, and their order of execution
  - build

build-job:       # This job runs in the build stage, which runs first.
  stage: build
  script:
    - gcc main.c -o main
    - echo "Compile complete."
  artifacts:
    paths:
      - main
详细可参考
五、用户个人信息配置
登陆后点击头像选择编辑个人资料。左侧的侧边栏有关于用户个人信息的配置。包括密码、密钥、邮件等。
六、权限与安全
1) root用户忘记密码怎么办
可以在服务器的命令行中进入gitlab控制台修改root密码
# 进入gitlab终端
sudo gitlab-rails console -e production
# 输入以下命令重置密码,将 new_password 替换为您要设置的新密码
user = User.where(id: 1).first
user.password = 'new_password'
user.password_confirmation = 'new_password'
user.save!
# 退出gitlab终端
exit
# 重启gitlab生效配置
sudo gitlab-ctl restart
2) 普通用户升级为管理员
默认web端的系统无法将普通用户升级为管理员,需要进入服务器,在gitlab的后台直接修改数据库数据
# 进入gitlab数据库环境
su - gitlab-psql
# 连接数据库
psql -h /var/opt/gitlab/postgresql -d gitlabhq_production
# 更新users表,邮箱为指定邮箱的用户,admin列的值为t (t为true,f为false)(设置为t授予管理员权限,设置为f取消管理员权限)
update users set admin='t' where email='用户邮箱';如果熟练sql语言,还可以通过其它选项筛选用户
# 查看所有用户的id,username,email,admin
select (id,username,email,admin) from users;
修改完之后通过两次exit命令逐步退出到Linux系统命令行中。修改数据库在执行完修改命令后立即生效
其它问题
删除用户后无法重新注册同用户名的用户,提示用户名已存在
可以通过
gitlab-ctl restart命令解决,暂未找到更优的方案gitlab启动失败
fail: alertmanager: runsv not runningsystemctl start gitlab-runsvdir gitlab-ctl restart在执行
gitlab-ctl reconfigure命令时出现There was an error running gitlab-ctl reconfigure: letsencrypt_certificate[192.168.171.142] (letsencrypt::http_authorization line 6) had an error: Acme::Client::Error::RejectedIdentifier: acme_certificate[staging] (letsencrypt::http_authorization line 43) had an error: Acme::Client::Error::RejectedIdentifier: Error creating new order :: Cannot issue for "192.168.171.142": The ACME server can not issue a certificate for an IP addressexternal_url配置项中将https改为http,使用ip地址时证书无法颁发,无法使用https
参考文档
- 官方安装参考
- [安装参考] Ubuntu 22.04 | 20.04 系统中安装 Gitlab
- 修改Gitlab代码仓库存储目录
- GitLab 设置为中文版
- [初始化密码] gitlab安装及使用教程
- gitlab 修改访问端口
- [gitlab runner] GitLab的安装与设置
- [gitlab runner] Hello Git(九)——GitLab CI持续集成
- [gitlab runner] .gitlab-ci.yml 配置文件详解
- GitLab不同角色对应的权限
- GitLab权限设置、分支保护、Issue/Merge Request模板
- GitLab启动失败:fail: alertmanager: runsv not running
- gitlab忘记root密码解决方法
- Gitlab忘记root用户密码的解决办法
- [普通用户升级为管理员用户] 第十一章 Gitlab权限管理